

In wood carving relief carving is a type in which figures or patterns are carved in a flat panel of wood; the same term is also used for carving in stone, ivory carving and various other materials. The figures project only slightly from the background rather than standing freely. Depending on the degree of projection, reliefs may also be classified as high or medium relief.
Relief carving can be described as "carving pictures in wood". The process of relief carving involves removing wood from a flat wood panel in such a way that an object appears to rise out of the wood. Relief carving begins with a design idea, usually put to paper in the form of a master pattern which is then transferred to the wood surface. Most relief carving is done with hand tools, chisels and gouges, which often require a mallet to drive them through the wood.
As wood is removed from the panel around the objects traced onto it from the pattern, the objects themselves stand up from the background wood. Modelling of the objects can take place as soon as enough background has been removed and the object edges are trimmed to the pattern lines.
In order to secure the wood panel, a workbench with fixtures like bench-dogs, carver's screws or clamps, is necessary. Carving tools come in a wide variety of shapes and sizes, some aimed strictly at the hobbyist, but others directed at professional carvers. Some carving tools are held with one hand while the carving is held in the other. But most relief carving requires that the wood panel be secured so that both hands may be on the carving tool.
Much of the skill required for relief carving lies in learning to grip and manipulate tools to get the desired effect. Tool sharpening is also a necessary skill to learn, and dull tools are a severe obstacle to effective carving.
Stages of relief carving[edit]
- Create a pattern, drawn on paper.
- Prepare a wood panel for carving. This may be a single piece of wood or a laminated panel.
- Transfer the pattern to the panel, using carbon paper as the transfer medium.
- Remove wood around the objects that comprise the pattern.
- Model the objects
- Detail the objects
- Tidy the background behind the objects
- Apply a suitable finish to the panel
Styles of relief carving[edit]
- 1. High relief, usually between 1/2" and 2" in depth.
- 2. Bas relief, or Low relief usually under 1/2" in depth.
- 3. Deep relief, usually over 2" in depth.
- 4. Pierced relief, where holes are carved clear through the wood.
Some carvers prefer to finish their carving with a clear finish. But others incorporate color and pyrography into their relief carvings.
-
 1. A low relief carving of a Dragonfly
 -
 2. Bas relief: A close-up of the crest for City of Grande Prairie, Alberta, Canada
 -
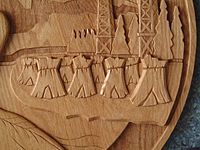
 3. Deep relief: Top of a paschal candle stand, 4" x 4" x 48", in red oak
 -
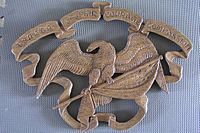 4. Pierced relief: Eagle Banner by Pat Donat, commemorating 9-11


See also[edit]
References[edit]
Spielmann, Marion Harry Alexander (1911). . In Chisholm, Hugh (ed.). Encyclopædia Britannica. Vol. 23 (11th ed.). Cambridge University Press. p. 61.